So it’s been sometime since the last tutorial and I apologize for that, I’ve been busy wrapping up my exams for my second degree and finishing off a mini thesis for one of my subjects. So now that it’s all over with I‘ve sat down and done a small tutorial on dx10 texturing.
A lot of other tutorials leave texturing for later on in the tutorial but I’m going to do it now because it’s so simple and further illustrates the point of shader programs and what role they play.
Texturing
So what is texturing? You can think of it like applying wallpaper to a blank wall, you take an image and attach it to an object in your scene. Well that’s not entirely true, what texturing actually does is use an image as a reference for what color an object is. Where before we set the color for each vertex and then let the API automatically interpolate the colors between vertices now we’re giving it an image to sample for those colors.
I’m not going to go into great detail regarding mipmaps and so on since it isn’t really necessary at this point, hopefully I’ll have the time to come back to it at a later stage and even if I don’t google is your friend 😛
Texturing occurs in the pixel shader stage of the pipeline, just before fragments are rasterized and so the bulk of the texturing code (all 1 line of it) needs to be done in HLSL.
There is one last thing I need to cover before I can get into the code, as I said earlier we give a object an image to use as a reference for the colors on the surface defined in the object but how does the API know which pixel in the image to use for a set of world co-ordinates on the surface? Well this is actually quite simple.
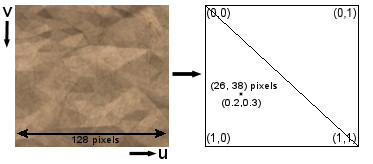
If we look at the above picture, for a 128×128 pixel texture which we want to use for the quad on the right. The first we need to do is set up some sort of coordinate system for the texture. We use the letters u and v for the two axes, please notice that v increases in a downwards direction, u and v are known as texture coordinates. This is because in an image, the first pixel is the top left image and the last pixel is the bottom right. Another restriction on this coordinate system is that u and v are real numbers ranging from 0 to 1 where 1 is 100% of the texture dimension. So the texture coordinates u=0.5, v=0.5 will return the center pixel in a texture.
Okay to attaching this texture to an object defined by a set of vertices in world space, we need to add a piece of information to each vertex: the texture coordinate of that vertex in respect to the texture. So for any two vertices, the API will sample the color values of the texture between the texture coordinates specified for each vertex. At any point in the object it will have a texture coordinate, to calculate what pixel to use in the image as the color reference is simple. The pixel coordinates x,y are simply calculated as such: x= round(u*(textureWidth-1)), y= round(v*(textureHeight-1)). Simple huh?
In the above image we want to use the entire texture for the quad and so specify the u,v coordinates accordingly. We also show the corresponding pixel coordinates for a point on the object with u,v coordinates: (0.2,0.3). Okay so that an idiots guide to texturing theory. Let’s dig into the code.
The first thing we need to do is take tutorial 2 and modify it for texturing. We remove the rotation for the triangle and add an extra vertex to generate a quad as in the below image:
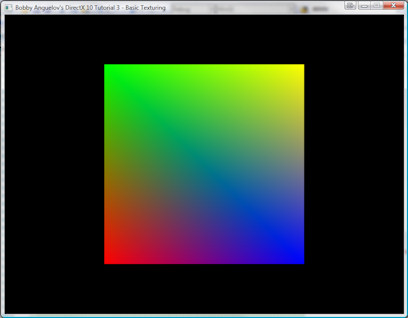
The code for the quad is:
v[0] = vertex( D3DXVECTOR3(-1,-1,0), D3DXVECTOR4(1,0,0,1));
v[1] = vertex( D3DXVECTOR3(-1,1,0), D3DXVECTOR4(0,1,0,1));
v[2] = vertex( D3DXVECTOR3(1,-1,0), D3DXVECTOR4(0,0,1,1));
v[3] = vertex( D3DXVECTOR3(1,1,0), D3DXVECTOR4(1,1,0,1));
Loading the Textures
So let’s load our textures, our first step is setting up storage for our textures and a way to pass it through to the shader program:
std::vector<ID3D10ShaderResourceView*> textureSRV;
ID3D10EffectShaderResourceVariable* pTextureSR;
Textures are loaded as ID3D10 resources, to which you need to create a view; a view tells DX how to access a particular resource. Since a texture is a shader resource that’s the type of view we need. The second variable is how we pass the texture id to the HLSL shaders.
So how do we load a texture from an image file? Well if you thought it would be a complicated and involved process you’re wrong, it’s a single function call (D3DX10CreateShaderResourceViewFromFile), and the code to load multiple textures into our texture storage is below.
vector<string> filenames;
filenames.push_back("textures/t1.bmp");
filenames.push_back("textures/t2.bmp");
filenames.push_back("textures/t3.bmp");

//load textures
for ( int i=0; i < (int) filenames.size(); i++ )
{
	textureSRV.push_back(NULL);

	if ( FAILED( D3DX10CreateShaderResourceViewFromFile( pD3DDevice, filenames[i].c_str(), NULL, NULL, &textureSRV[i], NULL ) ) )
	{
		  char err[255];
		  sprintf_s(err, "Could not load texture: %s!", filenames[i].c_str());
		  return fatalError( err );
	}
}
That function merges two steps, the creation of the texture and the resulting view to it, in one. Okay so now we’ve loaded the texture now what? Well we need to modify our vertex struct to support texture coordinates, texture coordinates have two dimensions, u and v, horizontal and vertical respectively. To attach a texture to a polygon you need to specify what part of the texture you want to put over the polygon.
struct vertex
{
	D3DXVECTOR3 pos;
	D3DXVECTOR4 color;
	D3DXVECTOR2 texCoord;
}
We use a 2d vector to specify the u,v coordinates for each vertex. So this also means the code for the qaud has changed to:
v[0] = vertex( D3DXVECTOR3(-1,-1,0),D3DXVECTOR4(1,0,0,1),D3DXVECTOR2(0.0f, 1.0f) );
v[1] = vertex( D3DXVECTOR3(-1,1,0),D3DXVECTOR4(0,1,0,1),D3DXVECTOR2(0.0f, 0.0f) );
v[2] = vertex( D3DXVECTOR3(1,-1,0),D3DXVECTOR4(0,0,1,1),D3DXVECTOR2(1.0f, 1.0f) );
v[3] = vertex( D3DXVECTOR3(1,1,0),D3DXVECTOR4(1,1,0,1),D3DXVECTOR2(1.0f, 0.0f) );
Since we changed the vertex struct we also need to modify the inputlayout accordingly, remember that the input layout tells DX what each vertex looks like. All we need to change is the input_element_desc for the input layout:
D3D10_INPUT_ELEMENT_DESC layout[] =
{
	{ "POSITION", 0, DXGI_FORMAT_R32G32B32_FLOAT, 0, 0, D3D10_INPUT_PER_VERTEX_DATA, 0 },
	{ "COLOR", 0, DXGI_FORMAT_R32G32B32A32_FLOAT, 0, 12, D3D10_INPUT_PER_VERTEX_DATA, 0 },
	{ "TEXCOORD", 0, DXGI_FORMAT_R32G32_FLOAT, 0, 28, D3D10_INPUT_PER_VERTEX_DATA, 0 }
};
Last step is to tell the API which texture to which just before we draw an object. Since in most basic cases we will only be using a single texture (multi-texturing comes later) we only need a single texture shader resource variable which we just update to the texture we want.
//set texture
pTextureSR->SetResource( textureSRV[textureIndex] );
Okay so now if we run the program we get… The exact same thing as before. Why?! Well this is obvious since we havent touched the pixel shader program at all.
Texturing using the Pixel Shader
So lets just tweak the shader program (basicEffect.fx), first thing we need to do is specify a texture variable for the shader as such:
Texture2D tex2D;
Then we create a samplerState, remember when I said earlier that we sample the texture to get a color at a specific set of u,v coordinates, a texture resource resource in HLSL has a sample method that samples that texture and returns the value at a specific point, now the way in which it sample that texture is done via the sampleState object. This object sets all the parameters for the default sampler. A very basic samplerState is show below:
SamplerState linearSampler
{
    Filter = MIN_MAG_MIP_LINEAR;
    AddressU = Wrap;
    AddressV = Wrap;
};
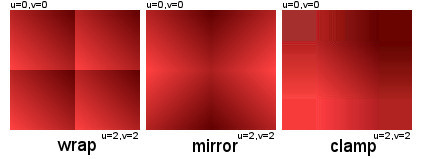
It has three elements: a filter which specifies how the sampling is to be done over the texture, in our case we’re just doing a basic linear sampling (all the sampling states and their descriptions are available in the SDK docs, the addressU and addressV specify how to handle u and v values that lie outside the 0 to 1 range.
Remember how I said that u and v are in the range 0 to 1, well that’s not exactly true, sometimes to want to texture an object using 4 smaller versions of a texture rather than stretching the texture to fit the the object. The below image shows what happens for a few common addressU , addressV values:
There are other state variables for the samplerState object, once again all the info necessary is in the sdk docs.
Now we need to modify the vs_input and ps_input structs to handle the extra 2d texcoord variable:
struct VS_INPUT
{
	float4 Pos : POSITION;
	float4 Color : COLOR;
	float2 Tex : TEXCOORD;
};

struct PS_INPUT
{
	float4 Pos : SV_POSITION;
	float4 Color : COLOR;
	float2 Tex : TEXCOORD;
};
And the vector and pixel shaders accordingly. The only difference in the pixel shader is that for texturing we need to return the sampled color and not the vertex color. We use the sample method on the texture object , the sampler state we defined earlier and the texture coordinates we specified earlier.
PS_INPUT VS( VS_INPUT input )
{
	PS_INPUT output;
	output.Pos = mul( input.Pos, World );
	output.Pos = mul( output.Pos, View );
	output.Pos = mul( output.Pos, Projection );
	output.Color = input.Color;
	output.Tex = input.Tex;

	return output;
}

float4 textured( PS_INPUT input ) : SV_Target
{
	return tex2D.Sample( linearSampler, input.Tex );
}

float4 noTexture( PS_INPUT input ) : SV_Target
{
	return input.Color;
}
We also create two new techniques “full” and “texturing disabled”:
technique10 full
{
    pass P0
    {
        SetVertexShader( CompileShader( vs_4_0, VS() ) );
        SetGeometryShader( NULL );
        SetPixelShader( CompileShader( ps_4_0, textured() ) );
    }
}

technique10 texturingDisabled
{
    pass P0
    {
        SetVertexShader( CompileShader( vs_4_0, VS() ) );
        SetGeometryShader( NULL );
        SetPixelShader( CompileShader( ps_4_0, noTexture() ) );
    }
}
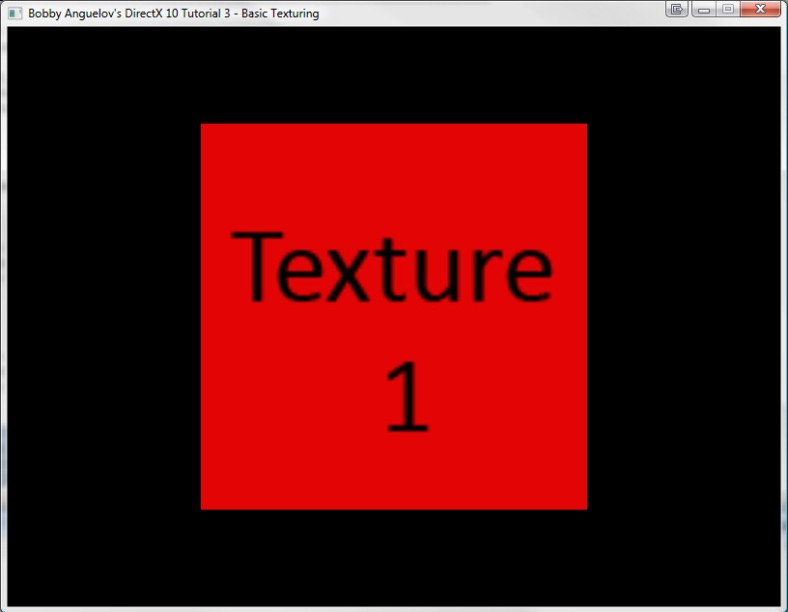
Then we load these two techniques exactly as we did in the previous tutorial. If we compile and run the program we’re presented with a now textured quad.
If we change the texture co-ordinates to :
v[0] = vertex( D3DXVECTOR3(-1,-1,0), D3DXVECTOR4(1,0,0,1), D3DXVECTOR2(0.0f, 2.0f) );
v[1] = vertex( D3DXVECTOR3(-1,1,0), D3DXVECTOR4(0,1,0,1), D3DXVECTOR2(0.0f, 0.0f) );
v[2] = vertex( D3DXVECTOR3(1,-1,0), D3DXVECTOR4(0,0,1,1), D3DXVECTOR2(2.0f, 2.0f) );
v[3] = vertex( D3DXVECTOR3(1,1,0), D3DXVECTOR4(1,1,0,1), D3DXVECTOR2(2.0f, 0.0f) );
The result is this:
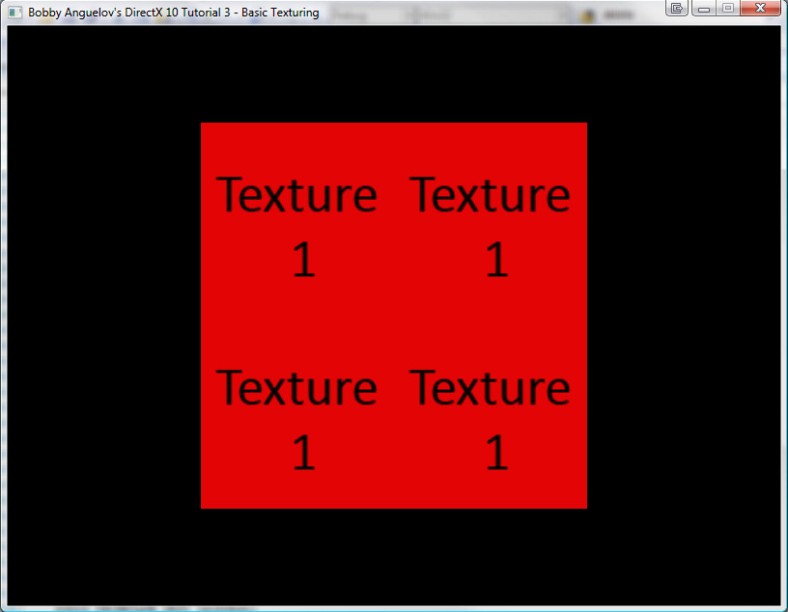
You can download the source code for this tutorial below. In the code you’ll notice that I add a method to swap the texture on the quad by modifying the textureIndex when I set the texture and to disable texturing by using the “texturingDisabled” technique instead of “Full”. Take a look at the wndProc method to see the controls and how they work.
I hope you’ve enjoyed this tutorial, I’ve already started working on the 4th one which will be about meshes and index buffers. I’m going to slowly write the turorials and build upon each one towards the final goal of rendering a field of thousands of blades of waving grass. I feel its pretty pointless to show you all the section seperately without explaining how they all link up together.
Source Code
Download the visual studio 2008 project: GitHub
I really enjoy the simplicity of your code because all other stuff on the internet and in the DXSDK is too hard for a beginner like me to understand and build on. Your tutorials are like a ladder out of a bottomless well, although earlier today (in my time zone) there were only two tutorials here. I hoped that after reading trough I will have enough knowledge to go on my own, but damn, you should have seen the look on my face when I found out that you have posted this tutorial.
I’m really glad to see that this blog is still alive, keep up the good work and thank you!
I’m really glad you enjoy my tutorials, hopefully I’ll have a few more for you shortly 😛
I did a quick run-through of your tutorials today and I’ve got to say they’re some of the best I’ve done. (And I’ve done lots :)) I’ve had a DXManager class for a long time, which I’m now rewriting in DX10 mode, so this has all been really useful, especially due to the nature of the MSDN tutorials to make everything global which drives me loopeh…
Only problem I do have is that I wouldn’t have introduced the removal of backface culling so early in the tutorial. A lot of books and tutorials do it, but I think it increases laziness to show how to turn it off so early on… buuuuut it’s your tutorials and they’re grrreat. So ignore me.
–N
Do you happen to know what kind of formats can D3DX10CreateShaderResourceViewFromFile load? It seems to work on jpg and bmp. Does it work on tga too? The MSDN is silent about this.
not off the top of my head, just check the sdk docs, afaik its bmp, jpg, dds.
http://wiki.gamedev.net/index.php/D3DBook:Table_Of_Contents
Great Post ! Thanks
Does DirectX support *.png Teextures ? How can we mask pixels to create transparency ?
yeh it does, check out my alpha blending tutorial for transparency info.
I really appreciate these tutorials as well. I’ve been trying to get into DirectX after having been stuck in openGL land for some time. Great work and keep it up!
Hi! its been a quite since you wrote this tutorial, but… ¿may I ask you about the ID3DX10Sprite interface?
Trying to program a 2D game, ¿should I use the texturized quad or a Sprite interface?
Thanks in advance!
Hi. The sprite interface is simply an abstraction for drawing a textured quad, I would advise not using it simply because it was deprecated in dx11. I would advise you to just write all the code yourself. Take a look at my geometry shader tutorial for a good example of how to create and render sprites manually.
Wenn ich es mir leisten könnte, würde ich auch Filme drehen, nach eigenen Konzepten, Drbecuhhautoren und Produzenten lassen sich ja auch finden, die machen ihren Teil für Geld schon.
To jak zrobisz sprzedaż to na przyszÅ‚ych targach książki w krakowie bÄ™dziesz gwiazdÄ… 🙂 I nawet panie z bÄ™dÄ… z TobÄ… rozmawiać 🙂 Zapytasz siÄ™ wtedy lekko gÅ‚Ä™bokim i stonowanym gÅ‚osem a co panie fascynuje w kupie 🙂 To tak odnoÅ›nie jednej audycji o książkach. Nie mogÄ™ siÄ™ doczekać co odpowiedzÄ… …
Hi, not sure if you still read this, but I tried running this program with Visual Studio 2010, and I keep getting the error “Could not load texture: %s!” from the shader resource view creation code.
I’m pretty sure this has something to do with me not putting the bmp textures files in the right directory, but I can’t figure out how to fix it.
Any help would be much appreciated.
Amazing explanations in your tutorials. Still a beginner at all this, so it’s really helping me to get to grips with the minefield that is directX. But after the multitude of other sites i’ve been banging my head against, I keep coming back to your clear & concise explanations on here.
Thanks, all these tutorials are much appreciated.
Great tutorials!! I’m transitioning my software rasterizer from directdraw to texture based dx10 and it’s really exciting to see it transform and you provide the exact code base that I need. To be useful, I’d like to suggest a small correction, as far as I’ve seen you didn’t mention how to get the shader resource mapped to textureSR. It’s obvious I guess but still I had to download the source to be sure, “pTextureSR = pBasicEffect->GetVariableByName( “tex2D” )->AsShaderResource();” Just a convinience matter as you provide the source, but would make it so we don’t have to 🙂 Keep up the great work, not too many pros have a teaching blog, thanks!!